Kubernetes Tutorial: The Ultimate Platform For Scale and Ease

I am a Data Engineer I love Python! I am based in Singapore I have good knowledge on cloud I have some knowledge on building Machine Learning Models I have helped 30+ companies use data effectively I have worked with Petabytes scale of data I write @ TowardsDataScience Nowadays I am focusing on learning Natural Language Processing Ask me about anything, I'll be happy to help.
For a number of data engineering tasks, Kubernetes (“koo-burr-NET-eez”), is now the platform of choice for scaling and deployment. But what is Kubernetes, how does it work, and how can you get started?
In this tutorial, I will take you through what makes Kubernetes the ultimate container orchestration system and how it allows any application to be scaled at the level of Google! So, sit back, and read on.
What is Kubernetes?
Kubernetes or k8s is a software that allows you to deploy, manage, and scale applications. It groups applications into units, allowing you to span the application over thousands of servers without looking like one single unit. It is meant to work best for microservice architecture but has now become a standard with all top cloud providers having Kubernetes support.
Recently, I have been working on migration of an existing application on Kubernetes. Even as the application is of a microservice-based architecture, we were facing issues from a pipeline perspective where we wanted to scale things up. We wanted to replicate an airflow task across VMS in parallel. So we decided it would be best if we scale this job on multiple pods on Kubernetes.
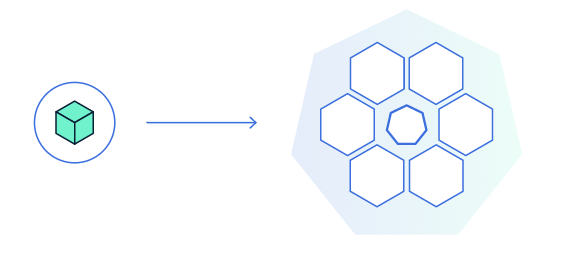
Container…What?
 on Unsplash*](https://cdn-images-1.medium.com/max/2000/1*ozuD1yeRo6AFZD75jtMTIg.png) Photo by Teng Yuhong on Unsplash
Photo by Teng Yuhong on Unsplash
Before we get into the mumbo-jumbo of the functions and functionalities of Kubernetes, let me take you through the basics first. It is important to know what a container is in order to fully understand the container orchestration systems.
A container is a standardized unit of software that packages up code and all its dependencies so that the application runs quickly and reliably from one computing environment to another, such as Mac, Windows Linux, and Ubuntu. To further elaborate, consider it as a packaged software like a disc image (dmg) which works because it has everything installed and can be pulled out and placed anywhere else, pretty much like a shipping container that can be put on a ship, train or truck.
This container mashup with a container orchestration system like Kubernetes becomes really useful for deploying microservice-based architecture, which has multiple microservices interacting with each other.
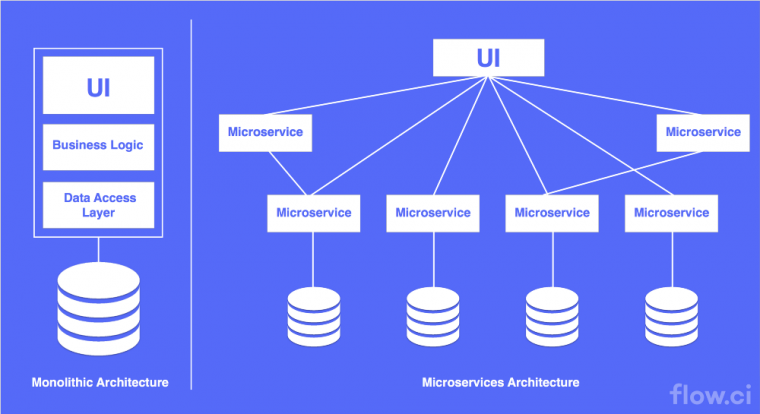 Microservice architecture diagram from flow.ci
So Why Kubernetes?
● Planet Scale Kubernetes has been designed on the same principles that allow Google to run billions of containers a week. It provides over 15 years of Google’s experience running production workloads at scale, without increasing your ops team. The main goal of Kubernetes is to provide ease of deployment, scaling, and maintenance.
● Never Outgrow Whether testing locally or running a global enterprise, Kubernetes offers flexibility to help deliver your applications consistently and easily, no matter how complex your need is. The platform provides you with a framework to run distributed systems resiliently. It takes care of scaling and failover for your application, provides deployment patterns, and more.
● Run Anywhere The open-source nature of Kubernetes allows you the freedom to leverage on-premises, hybrid, or public cloud infrastructure. You can effortlessly move workloads to where it matters to you. With modern web services, users expect applications to be available 24/7, and developers expect to deploy new versions of those applications several times a day and this is where Kubernetes becomes indispensable.
How Kubernetes works?
](https://cdn-images-1.medium.com/max/2160/1*587Q9MKCdwHwbod0yJvxyQ.png) image from kubernetes.io
image from kubernetes.io
● Cluster Kubernetes coordinates a highly available cluster of computers that are connected to work as a single unit. Consider this as multiple computers working together as one. When you use kubectl command to do anything, it is essentially a group working together at your service as one entity.
The abstractions in Kubernetes allow you to deploy containerized applications to a cluster without tying them specifically to individual machines. It automates the distribution and scheduling of application containers across a cluster in a more efficient way. In this cluster, the Master is responsible for managing the cluster and it coordinates all activities.
● Node A node is an actual VM or a physical computer that serves as a worker machine in a Kubernetes cluster. Each node has a set of software, Kubelet, installed with Kubernetes. Kubelet agent manages the node and communicates with the Kubernetes master. Node also has docker installed.
The nodes communicate with the master using the Kubernetes API. So when you use kubectl to deploy apps, you are usually talking to the whole cluster as a whole through master and not directly to each node. Every node contains — Kubelet — the process responsible for Kubernetes communication with master and a container runtime — Docker.
● Deployment
You can deploy containerized applications on top of a cluster by creating a Kubernetes Deployment configuration. The Deployment instructs Kubernetes on how to create and update instances of your application. Once you’ve created a Deployment, the Kubernetes master schedules the application instances included in that Deployment to run on individual nodes in the cluster. This provides a self-healing mechanism to address machine failure or maintenance.
Once the application instances are created, a Kubernetes Deployment Controller continuously monitors those instances. If the node hosting an instance goes down or is deleted, the deployment controller replaces the instance with an instance on another node in the cluster.
● Pod
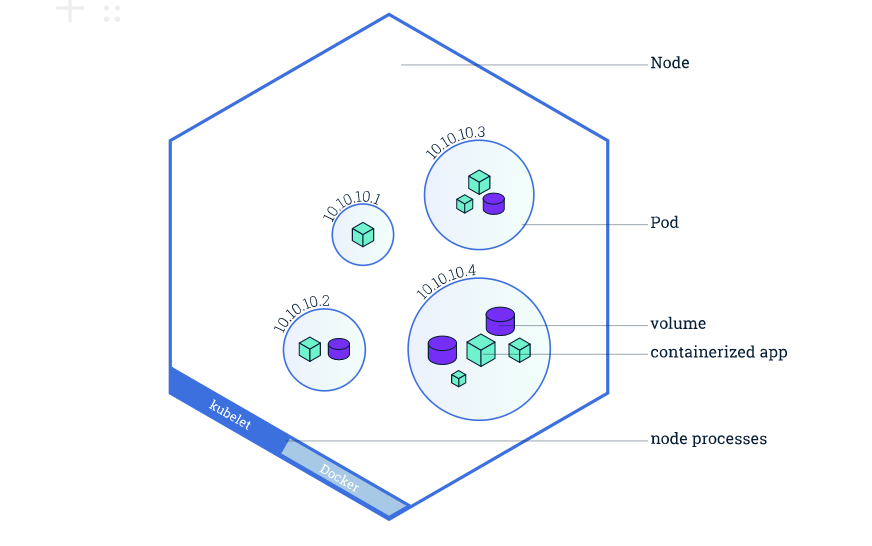
Pods are the atomic unit on the Kubernetes platform. When we create a Deployment on Kubernetes, that Deployment creates Pods with containers inside them (as opposed to creating containers directly). Each pod is tied to the node and a node can have multiple pods.
A Pod is a Kubernetes abstraction that represents a group of one or more application containers (such as Docker or rkt), and some shared resources for those containers. “logical host” and can contain different application containers which are relatively tightly coupled example, a Pod might include both the container with your Node.js app as well as a different container that feeds the data to be published by the Node.js webserver.
● Service By default, the Pod is only accessible by its internal IP address within the Kubernetes cluster. To make the Container accessible from outside the Kubernetes virtual network, you have to expose the Pod as a Kubernetes Service.
Tutorial with minkube
Now that we have covered the basics of Kubernetes, let us proceed with Minikube — a tool that makes it easy to run Kubernetes locally. Let’s take a look at how Minikube works.
A Kubernetes cluster has multiple nodes working together in a sync without any human intervention. Minikube essentially replicates this cluster using a single Virtual Machine (VM) on your laptop for users looking to try out Kubernetes or develop with it on a day-to-day basis.
The steps below will help you get started with Minikube and Kubernetes.
Install Virtualbox
- To simplify installation, Minikube will run on a local VM built using a Virtualbox. Click here and install respective hosts.
Install Minikube
- Mac Homebrew to be installed
brew install minikube
- For Windows, install from here
Start Minikube After virtual box and minikube is installed, start the minikube cluster, Easy peasy
minikube start --driver=virtualbox
Now your minikube cluster is up and running
To check out the Kubernetes dashboard run
minikube dashboard
Deploying WordPress and MySQL Using Minikube
Now that we know the installation and setting up of Minikube and Kubernetes, it is time to deploy it on WordPress and MySQL. Both applications use PersistentVolumes (PV) and PersistentVolumeClaim (PVC) to store data. Kubernetes defines a PV as a piece of storage in the cluster that has been manually provisioned by an administrator, or dynamically provisioned by Kubernetes using a StorageClass. A PersistentVolumeClaim (PVC) is a request for storage by a user that can be fulfilled by a PV. PersistentVolumes and PersistentVolumeClaims are independent of Pod lifecycles and preserve data through restarting, rescheduling, and even deleting Pods.
kuztomization.yaml
apiVersion: v1
kind: Secret
metadata:
  name: mysql-pass
data:
  password: YOUR_PASSWORD
mysql-deployment.yaml
application/wordpress/mysql-deployment.yaml

apiVersion: v1
kind: Service
metadata:
  name: wordpress-mysql
  labels:
    app: wordpress
spec:
  ports:
    - port: 3306
  selector:
    app: wordpress
    tier: mysql
  clusterIP: None
---
apiVersion: v1
kind: PersistentVolumeClaim
metadata:
  name: mysql-pv-claim
  labels:
    app: wordpress
spec:
  accessModes:
    - ReadWriteOnce
  resources:
    requests:
      storage: 20Gi
---
apiVersion: apps/v1 # for versions before 1.9.0 use apps/v1beta2
kind: Deployment
metadata:
  name: wordpress-mysql
  labels:
    app: wordpress
spec:
  selector:
    matchLabels:
      app: wordpress
      tier: mysql
  strategy:
    type: Recreate
  template:
    metadata:
      labels:
        app: wordpress
        tier: mysql
    spec:
      containers:
      - image: mysql:5.6
        name: mysql
        env:
        - name: MYSQL_ROOT_PASSWORD
          valueFrom:
            secretKeyRef:
              name: mysql-pass
              key: password
        ports:
        - containerPort: 3306
          name: mysql
        volumeMounts:
        - name: mysql-persistent-storage
          mountPath: /var/lib/mysql
      volumes:
      - name: mysql-persistent-storage
        persistentVolumeClaim:
          claimName: mysql-pv-claim
wordress-deployment.yaml
application/wordpress/wordpress-deployment.yaml

apiVersion: v1
kind: Service
metadata:
  name: wordpress
  labels:
    app: wordpress
spec:
  ports:
    - port: 80
  selector:
    app: wordpress
    tier: frontend
  type: LoadBalancer
---
apiVersion: v1
kind: PersistentVolumeClaim
metadata:
  name: wp-pv-claim
  labels:
    app: wordpress
spec:
  accessModes:
    - ReadWriteOnce
  resources:
    requests:
      storage: 20Gi
---
apiVersion: apps/v1 # for versions before 1.9.0 use apps/v1beta2
kind: Deployment
metadata:
  name: wordpress
  labels:
    app: wordpress
spec:
  selector:
    matchLabels:
      app: wordpress
      tier: frontend
  strategy:
    type: Recreate
  template:
    metadata:
      labels:
        app: wordpress
        tier: frontend
    spec:
      containers:
      - image: wordpress:4.8-apache
        name: wordpress
        env:
        - name: WORDPRESS_DB_HOST
          value: wordpress-mysql
        - name: WORDPRESS_DB_PASSWORD
          valueFrom:
            secretKeyRef:
              name: mysql-pass
              key: password
        ports:
        - containerPort: 80
          name: wordpress
        volumeMounts:
        - name: wordpress-persistent-storage
          mountPath: /var/www/html
      volumes:
      - name: wordpress-persistent-storage
        persistentVolumeClaim:
          claimName: wp-pv-claim
Now run the kubernetes configuration to spin up the instance
kubectl create -f k8/
Verify that the Pod is running by running the following command:
kubectl get pods
Verify that the Service is running by running the following command:
kubectl get services wordpress
Run the following command to get the IP Address for the WordPress Service:
minikube service wordpress --url
The response should be like this:
<http://1.2.3.4:32406>
Copy the IP address, and load the page in your browser to view your site.
You should see the WordPress set up a page similar to the following screenshot.
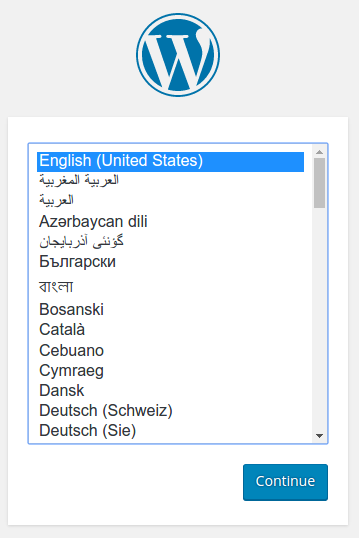 Start image of Wordpress server
Voila! Your WordPress is now up and running on a Kubernetes cluster.
What’s Next
In my next blog, I will talk about various case studies on how Kubernetes helped solve large scale problems for big companies such as Spotify and Pinterest.
Follow me on Linkedin
If you are interested in similar content do follow me on Linkedin